Home Assistant Time Machine is a web-based tool that acts as a "Time Machine" for your Home Assistant configuration. Browse YAML backups across automations, scripts, Lovelace dashboards, ESPHome files, and packages, then restore individual items back to your live setup with confidence.
- Multi-language Support: Available in English, Spanish, German, French, Dutch, and Italian.
- Docker Images & Docker Compose: Automated Docker image builds are now published on GHCR, and
compose.yamlis included for easy one-command deployment. - Ingress Support: Full support for Home Assistant ingress, allowing seamless access through the Home Assistant UI without port forwarding.
- Lovelace Backup Support: Comprehensive backup and restore functionality for your Lovelace UI configurations, ensuring your dashboards are always safe.
- ESPHome & Packages Backup Support: Enable backups for ESPHome and Packages via a toggle in the add-on configuration.
- Backup Now Button: Trigger an immediate backup of your Home Assistant configuration directly from the UI with a single click. This utilizes a new API for programmatic backups, shared with the scheduled backup feature.
- Max Backups: Set a limit on how many backups are kept.
- Authentication: Secure access with Home Assistant authentication integration, automatically proxying through the Supervisor when available.
- Docker Container Installation: Simplified installation process with a dedicated Docker container option, providing more flexibility for users without the Home Assistant add-on store.
- Optimized Size & Performance: The add-on is now 4X smaller and uses 6X less memory, making it faster to download and run.
- Dark/Light Mode: Choose between dark and light themes in the configuration.
- Flexible Backup Locations: Backups can now be stored in
/share/backup/configor/media. Folders are created automatically, and remote share backups are supported. - REST API: Comprehensive API for managing backups, restores, and configurations.
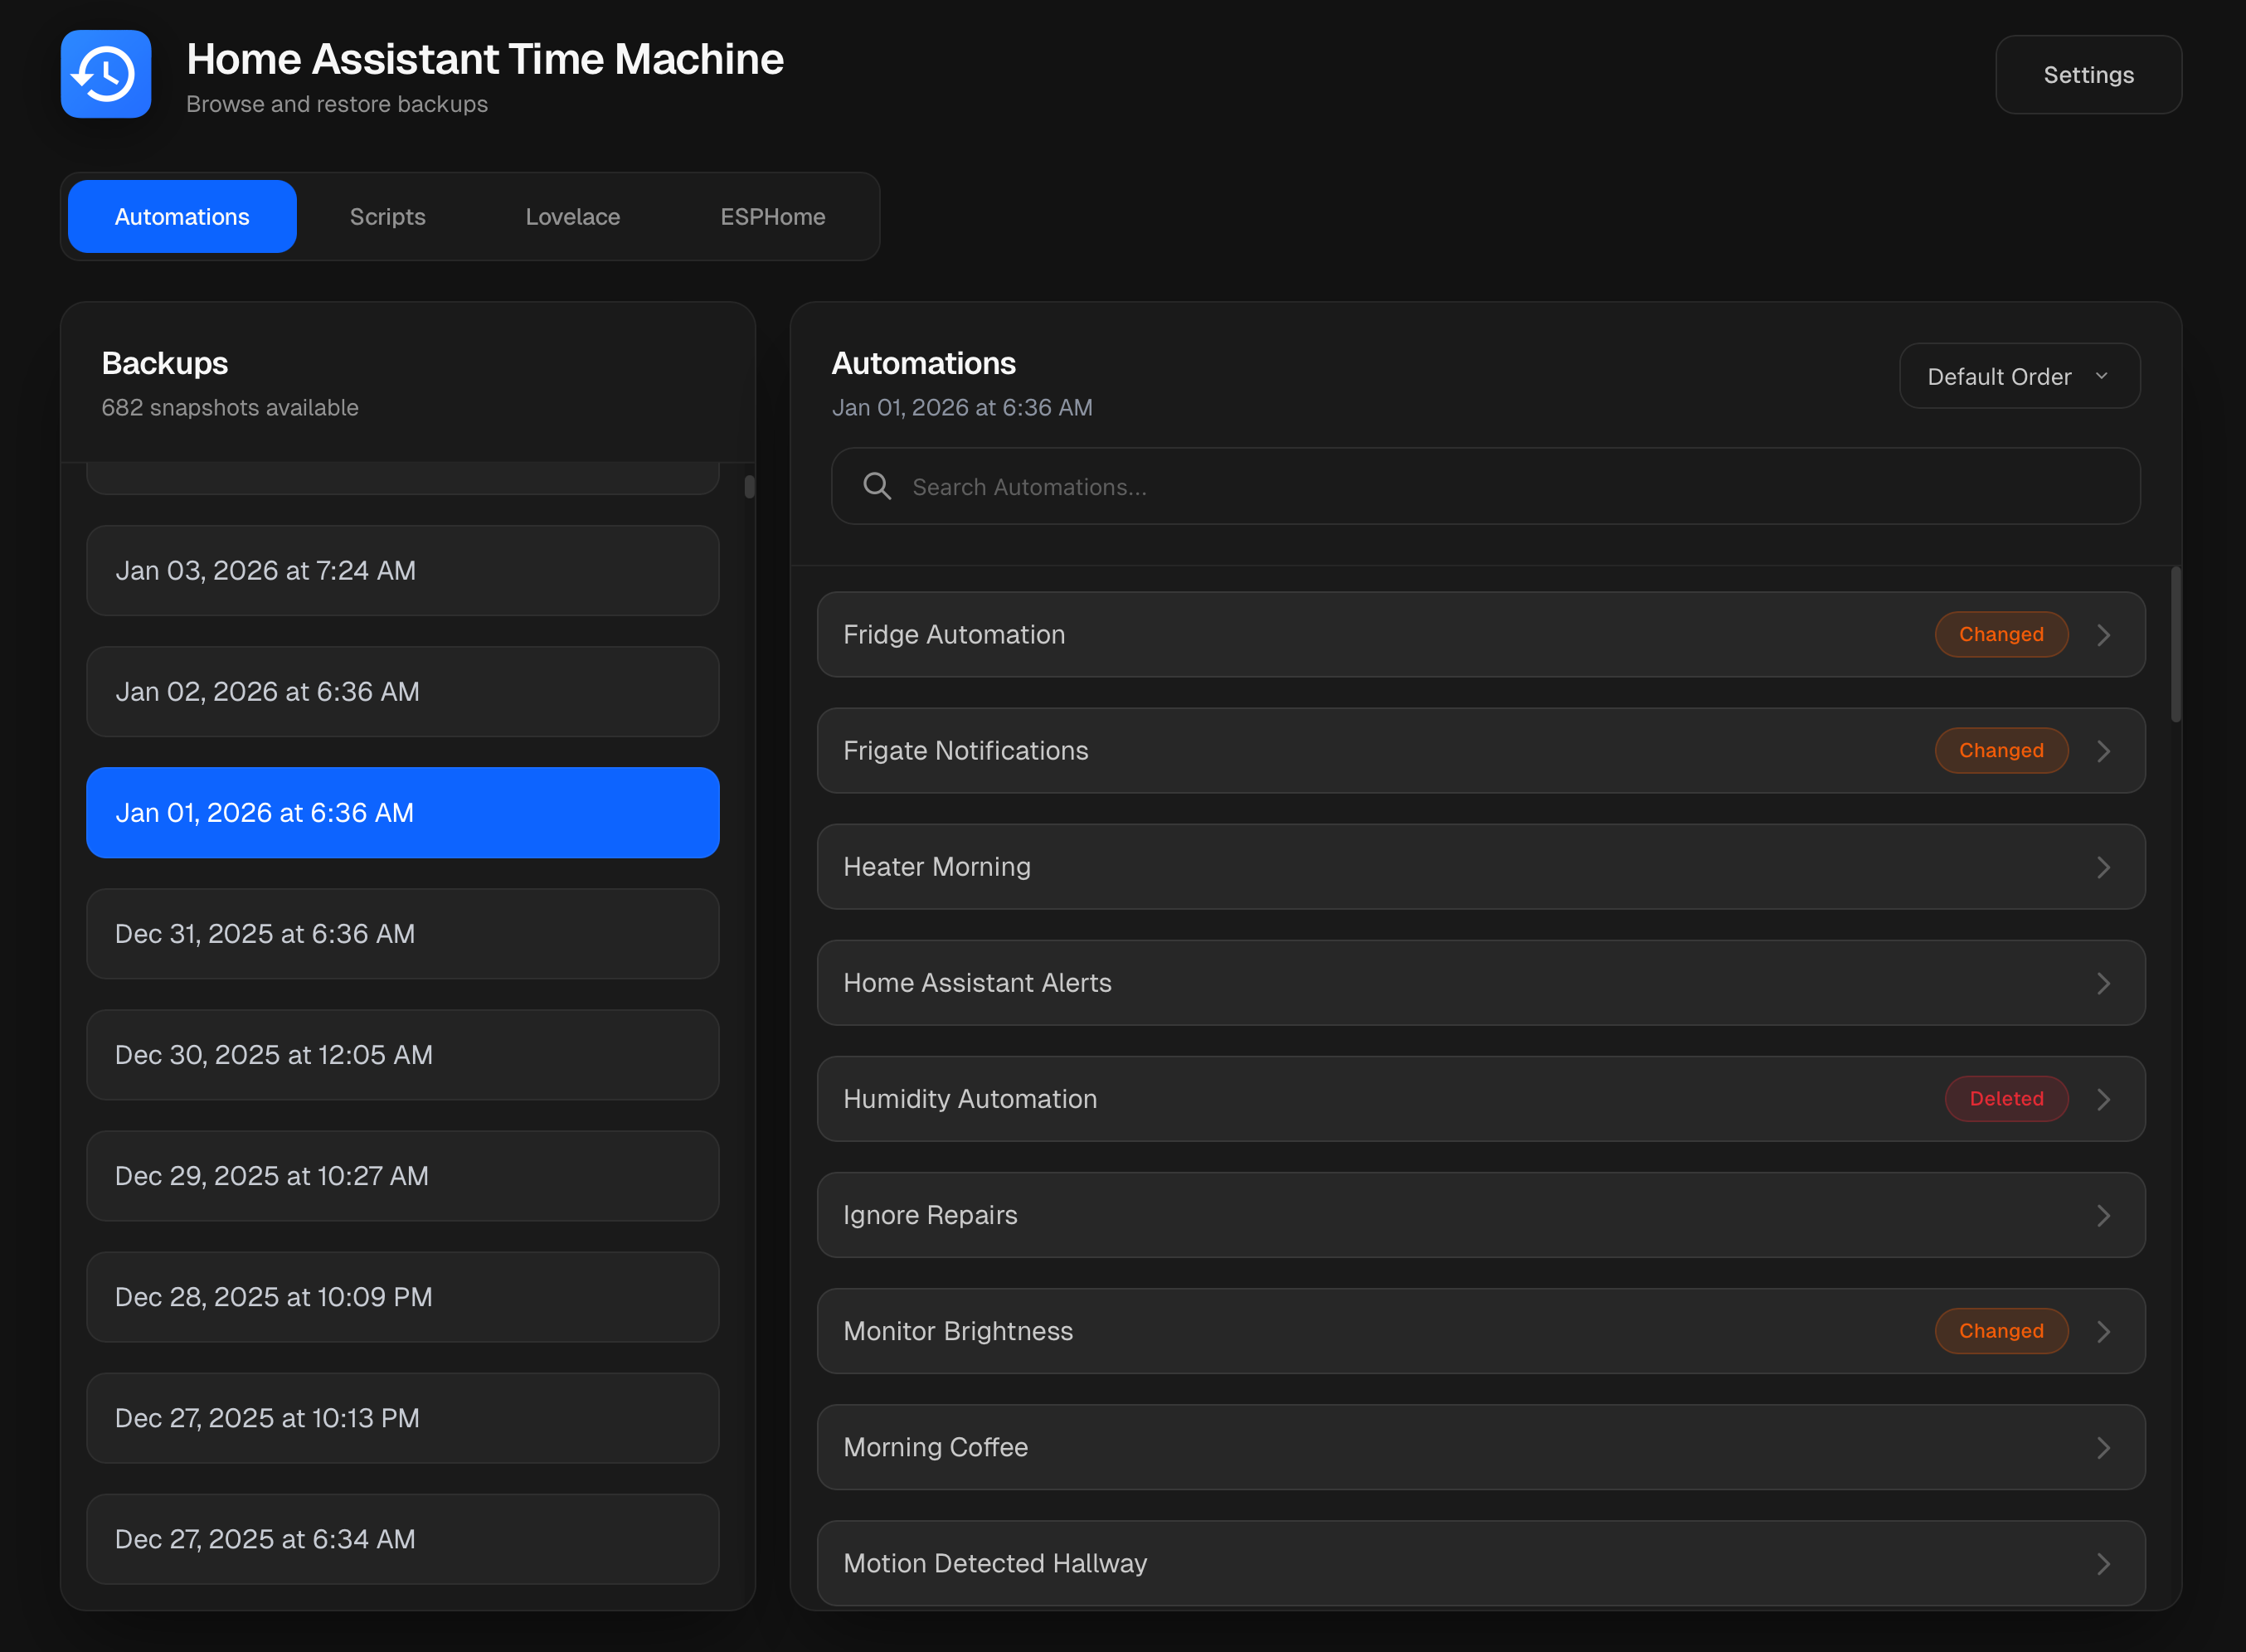
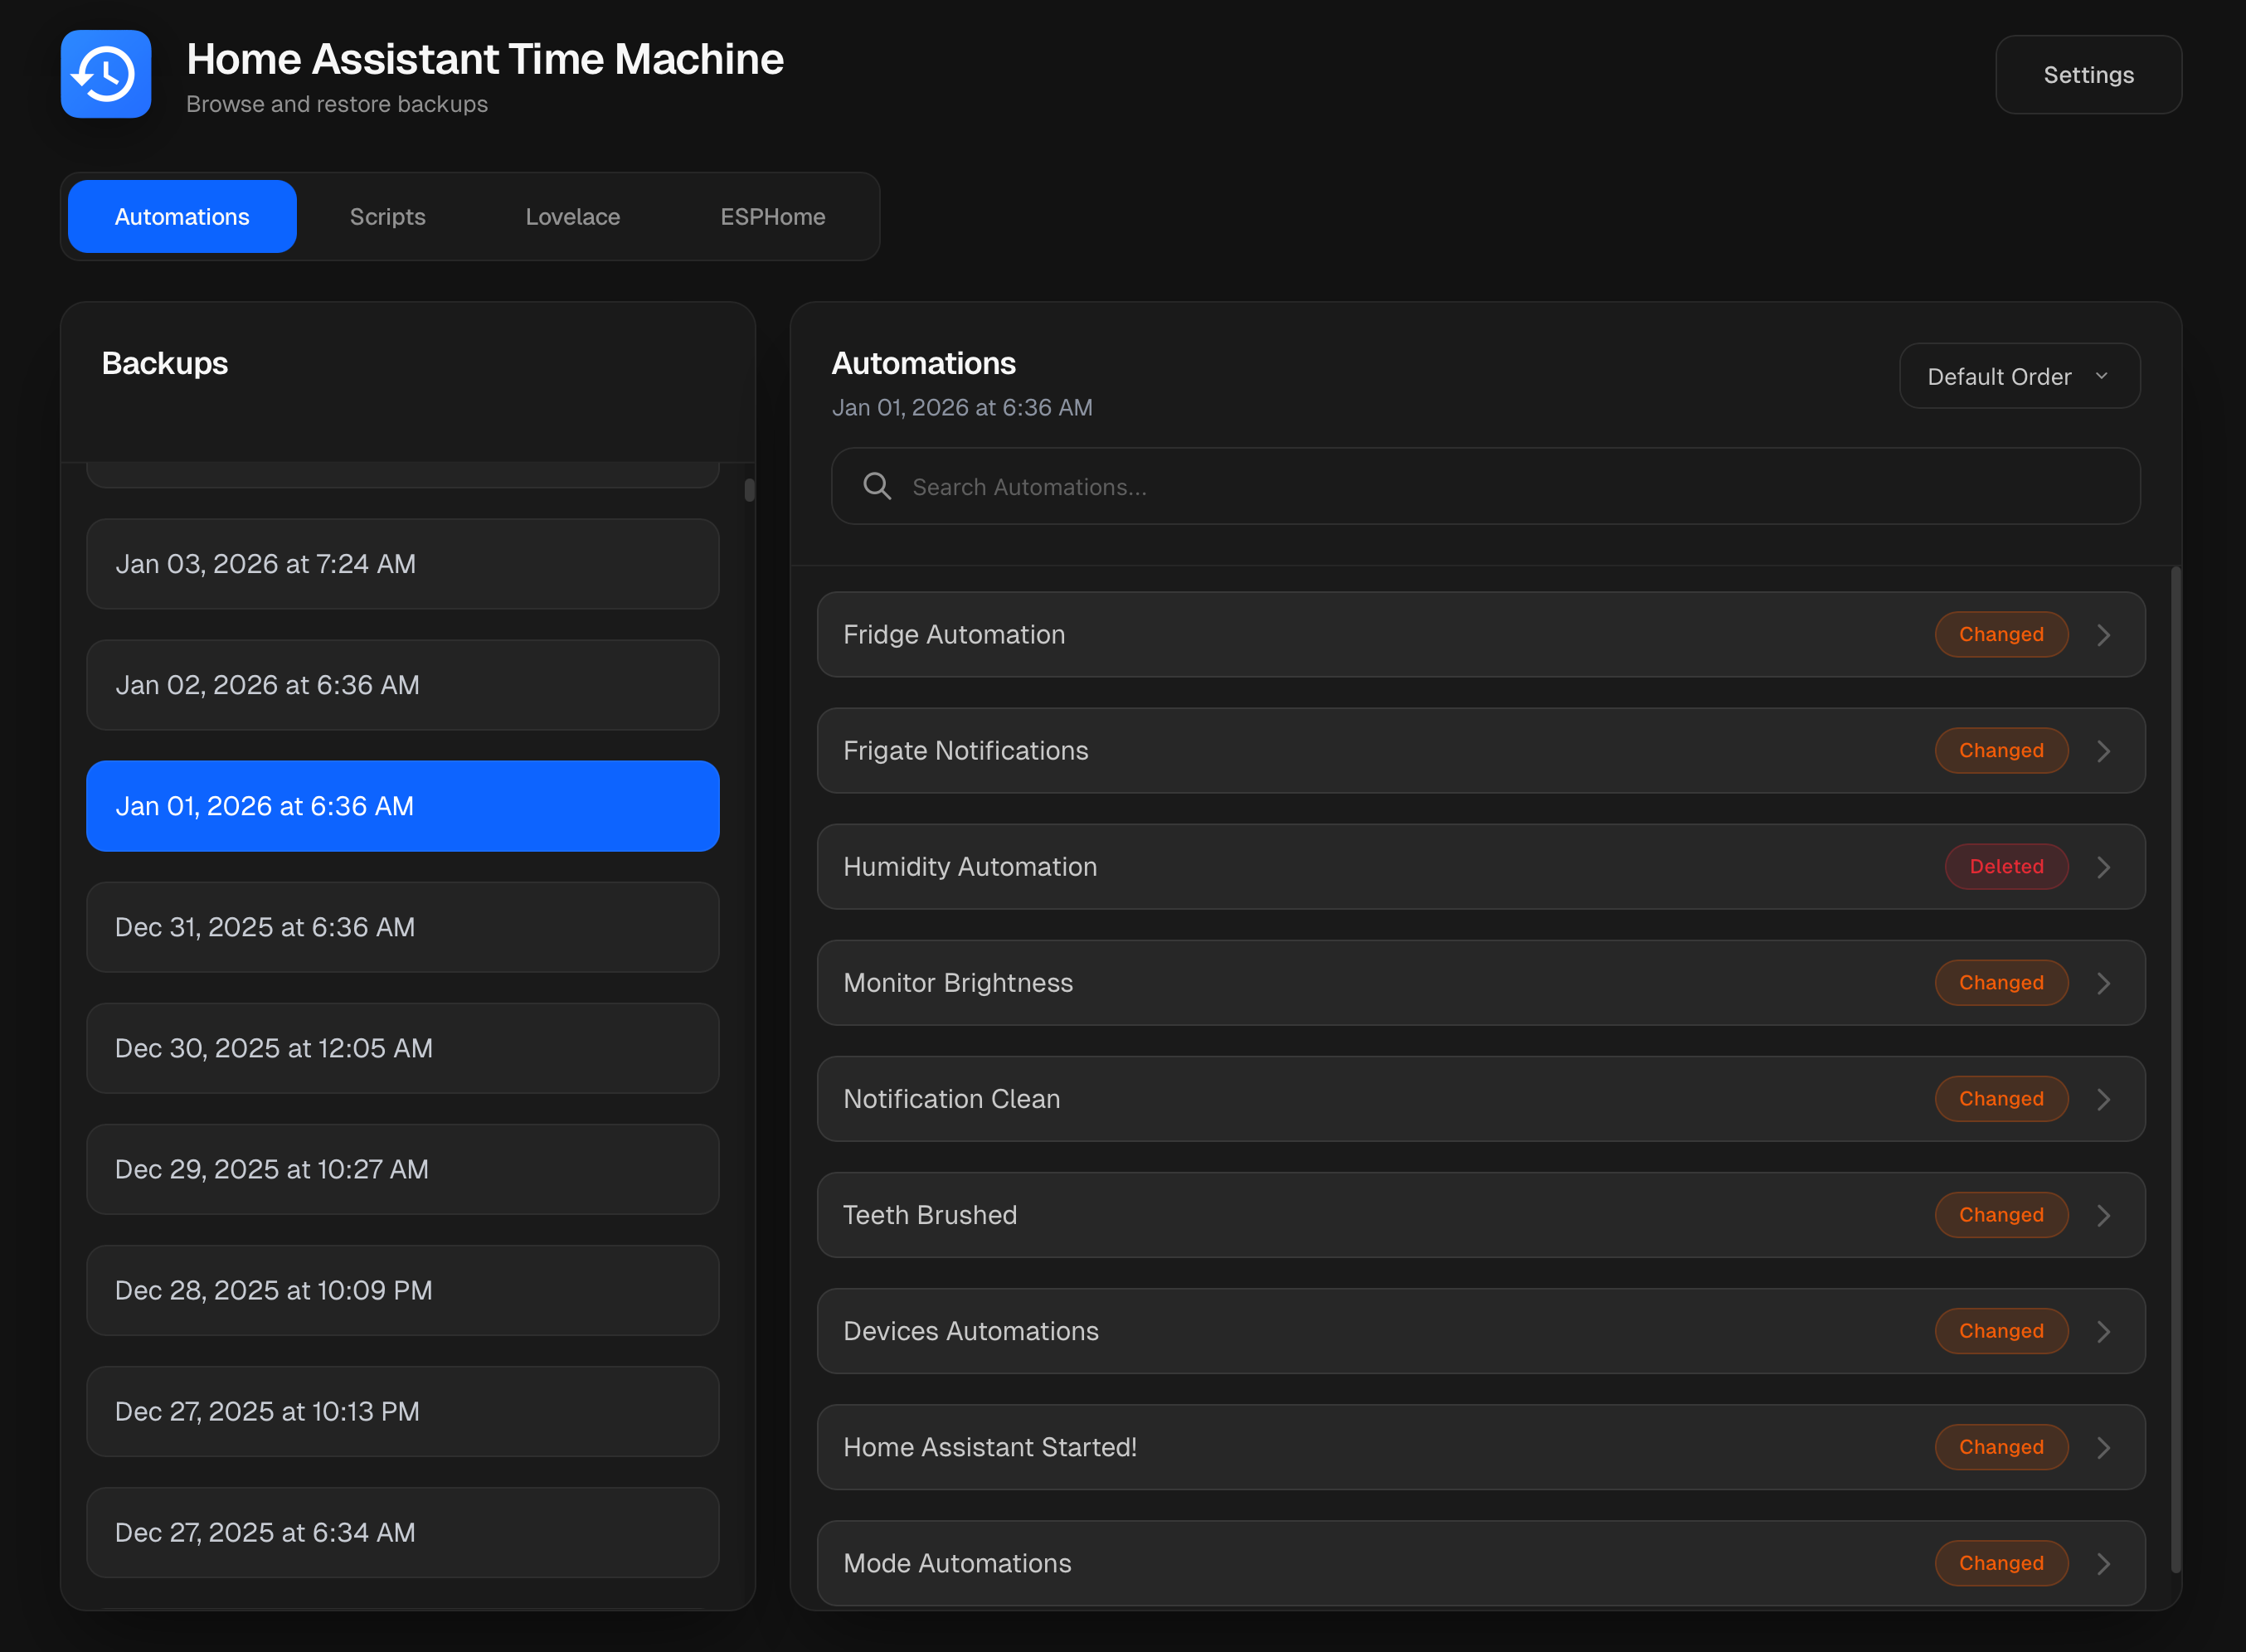
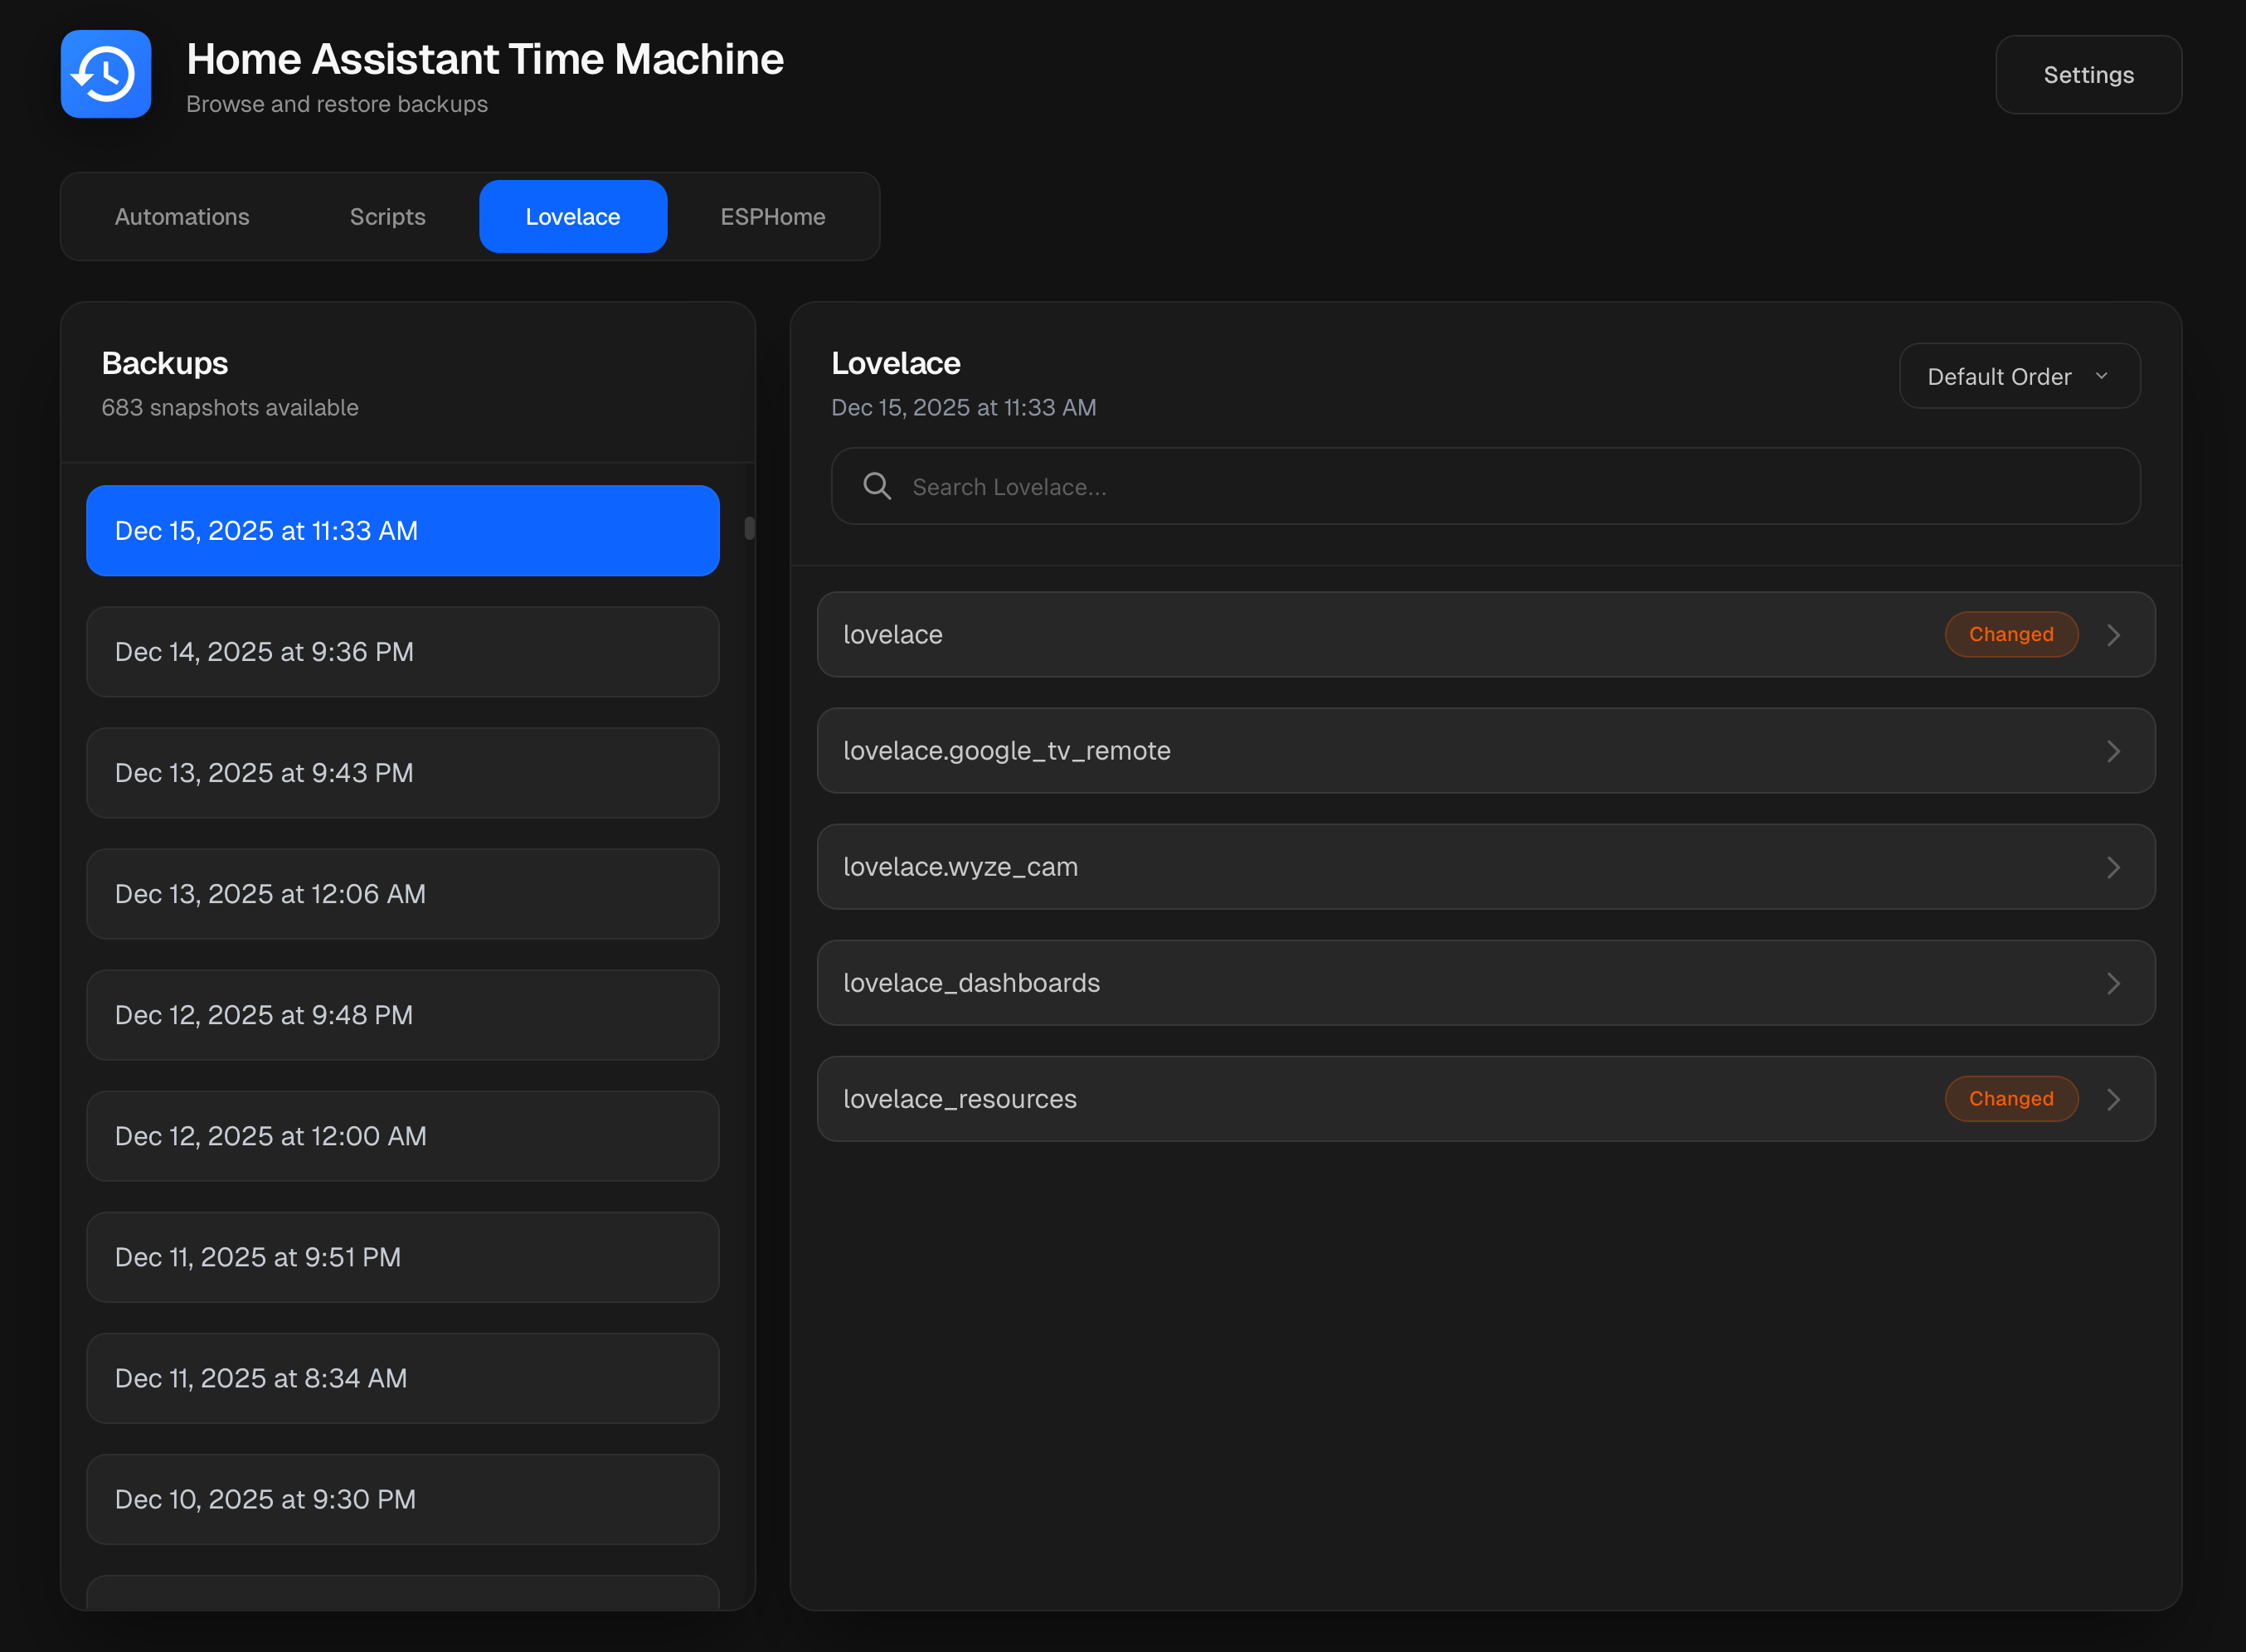
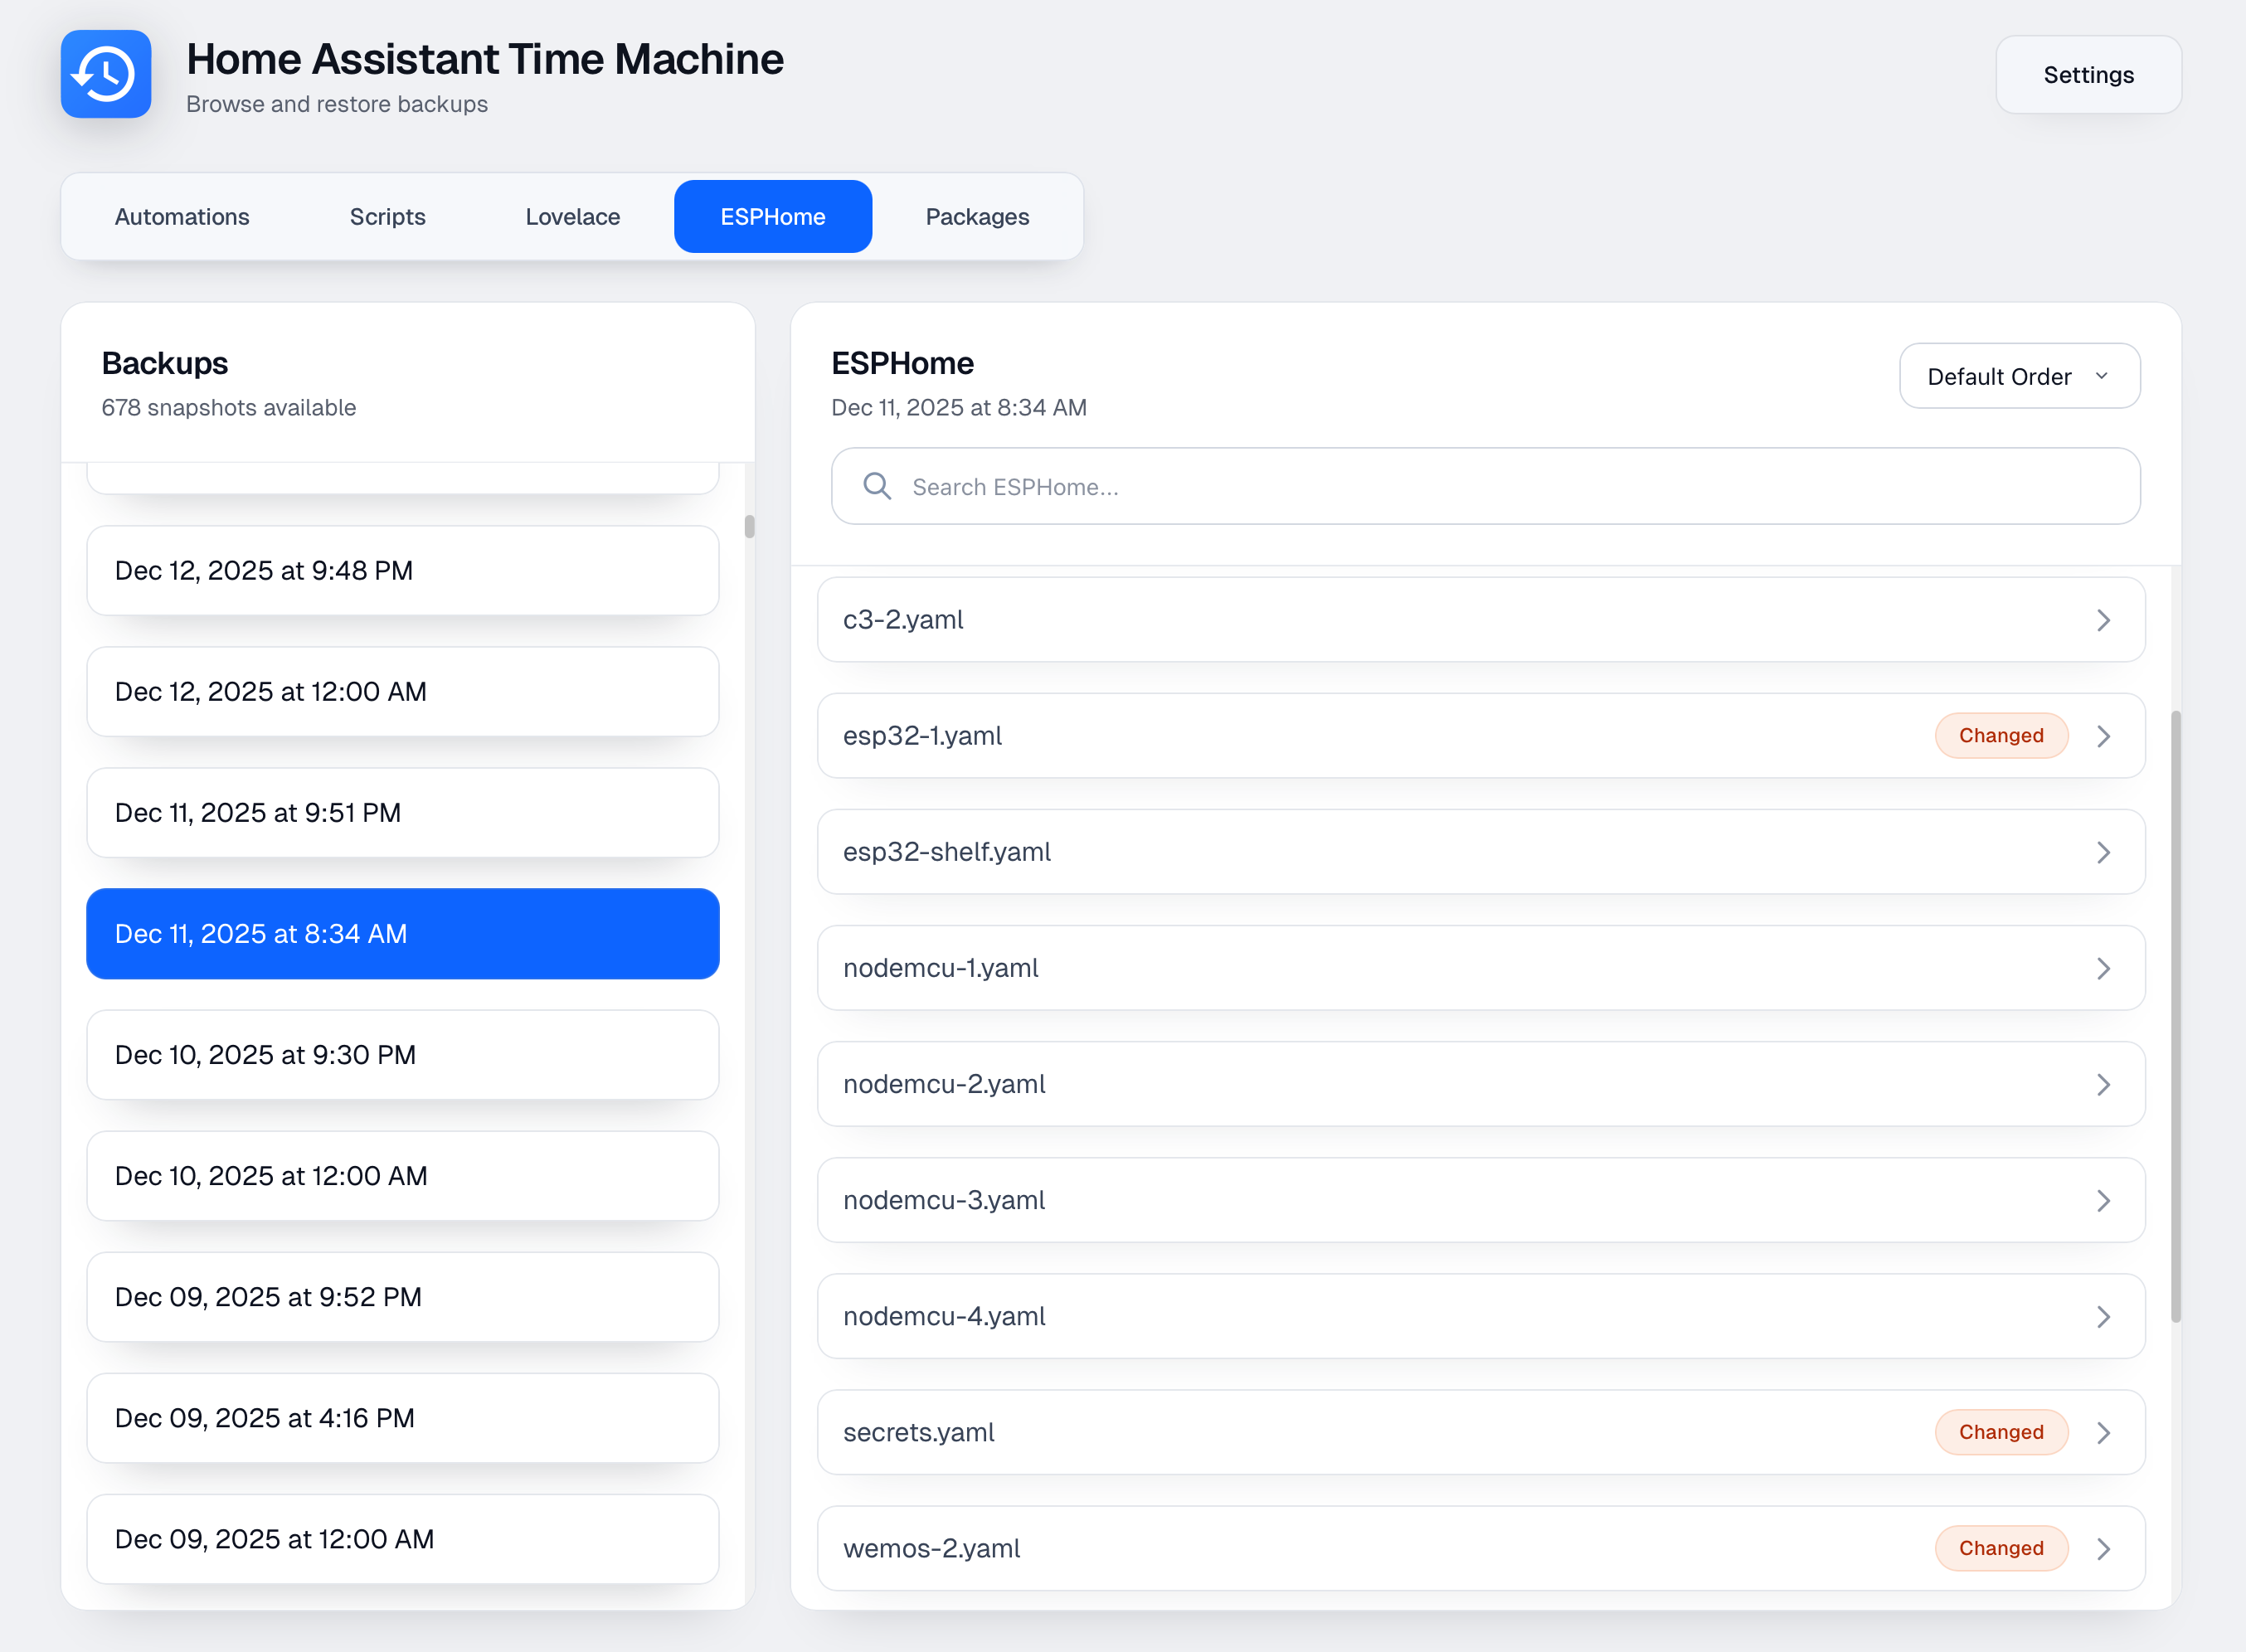
- Browse Backups: Easily browse through your Home Assistant backup YAML files.
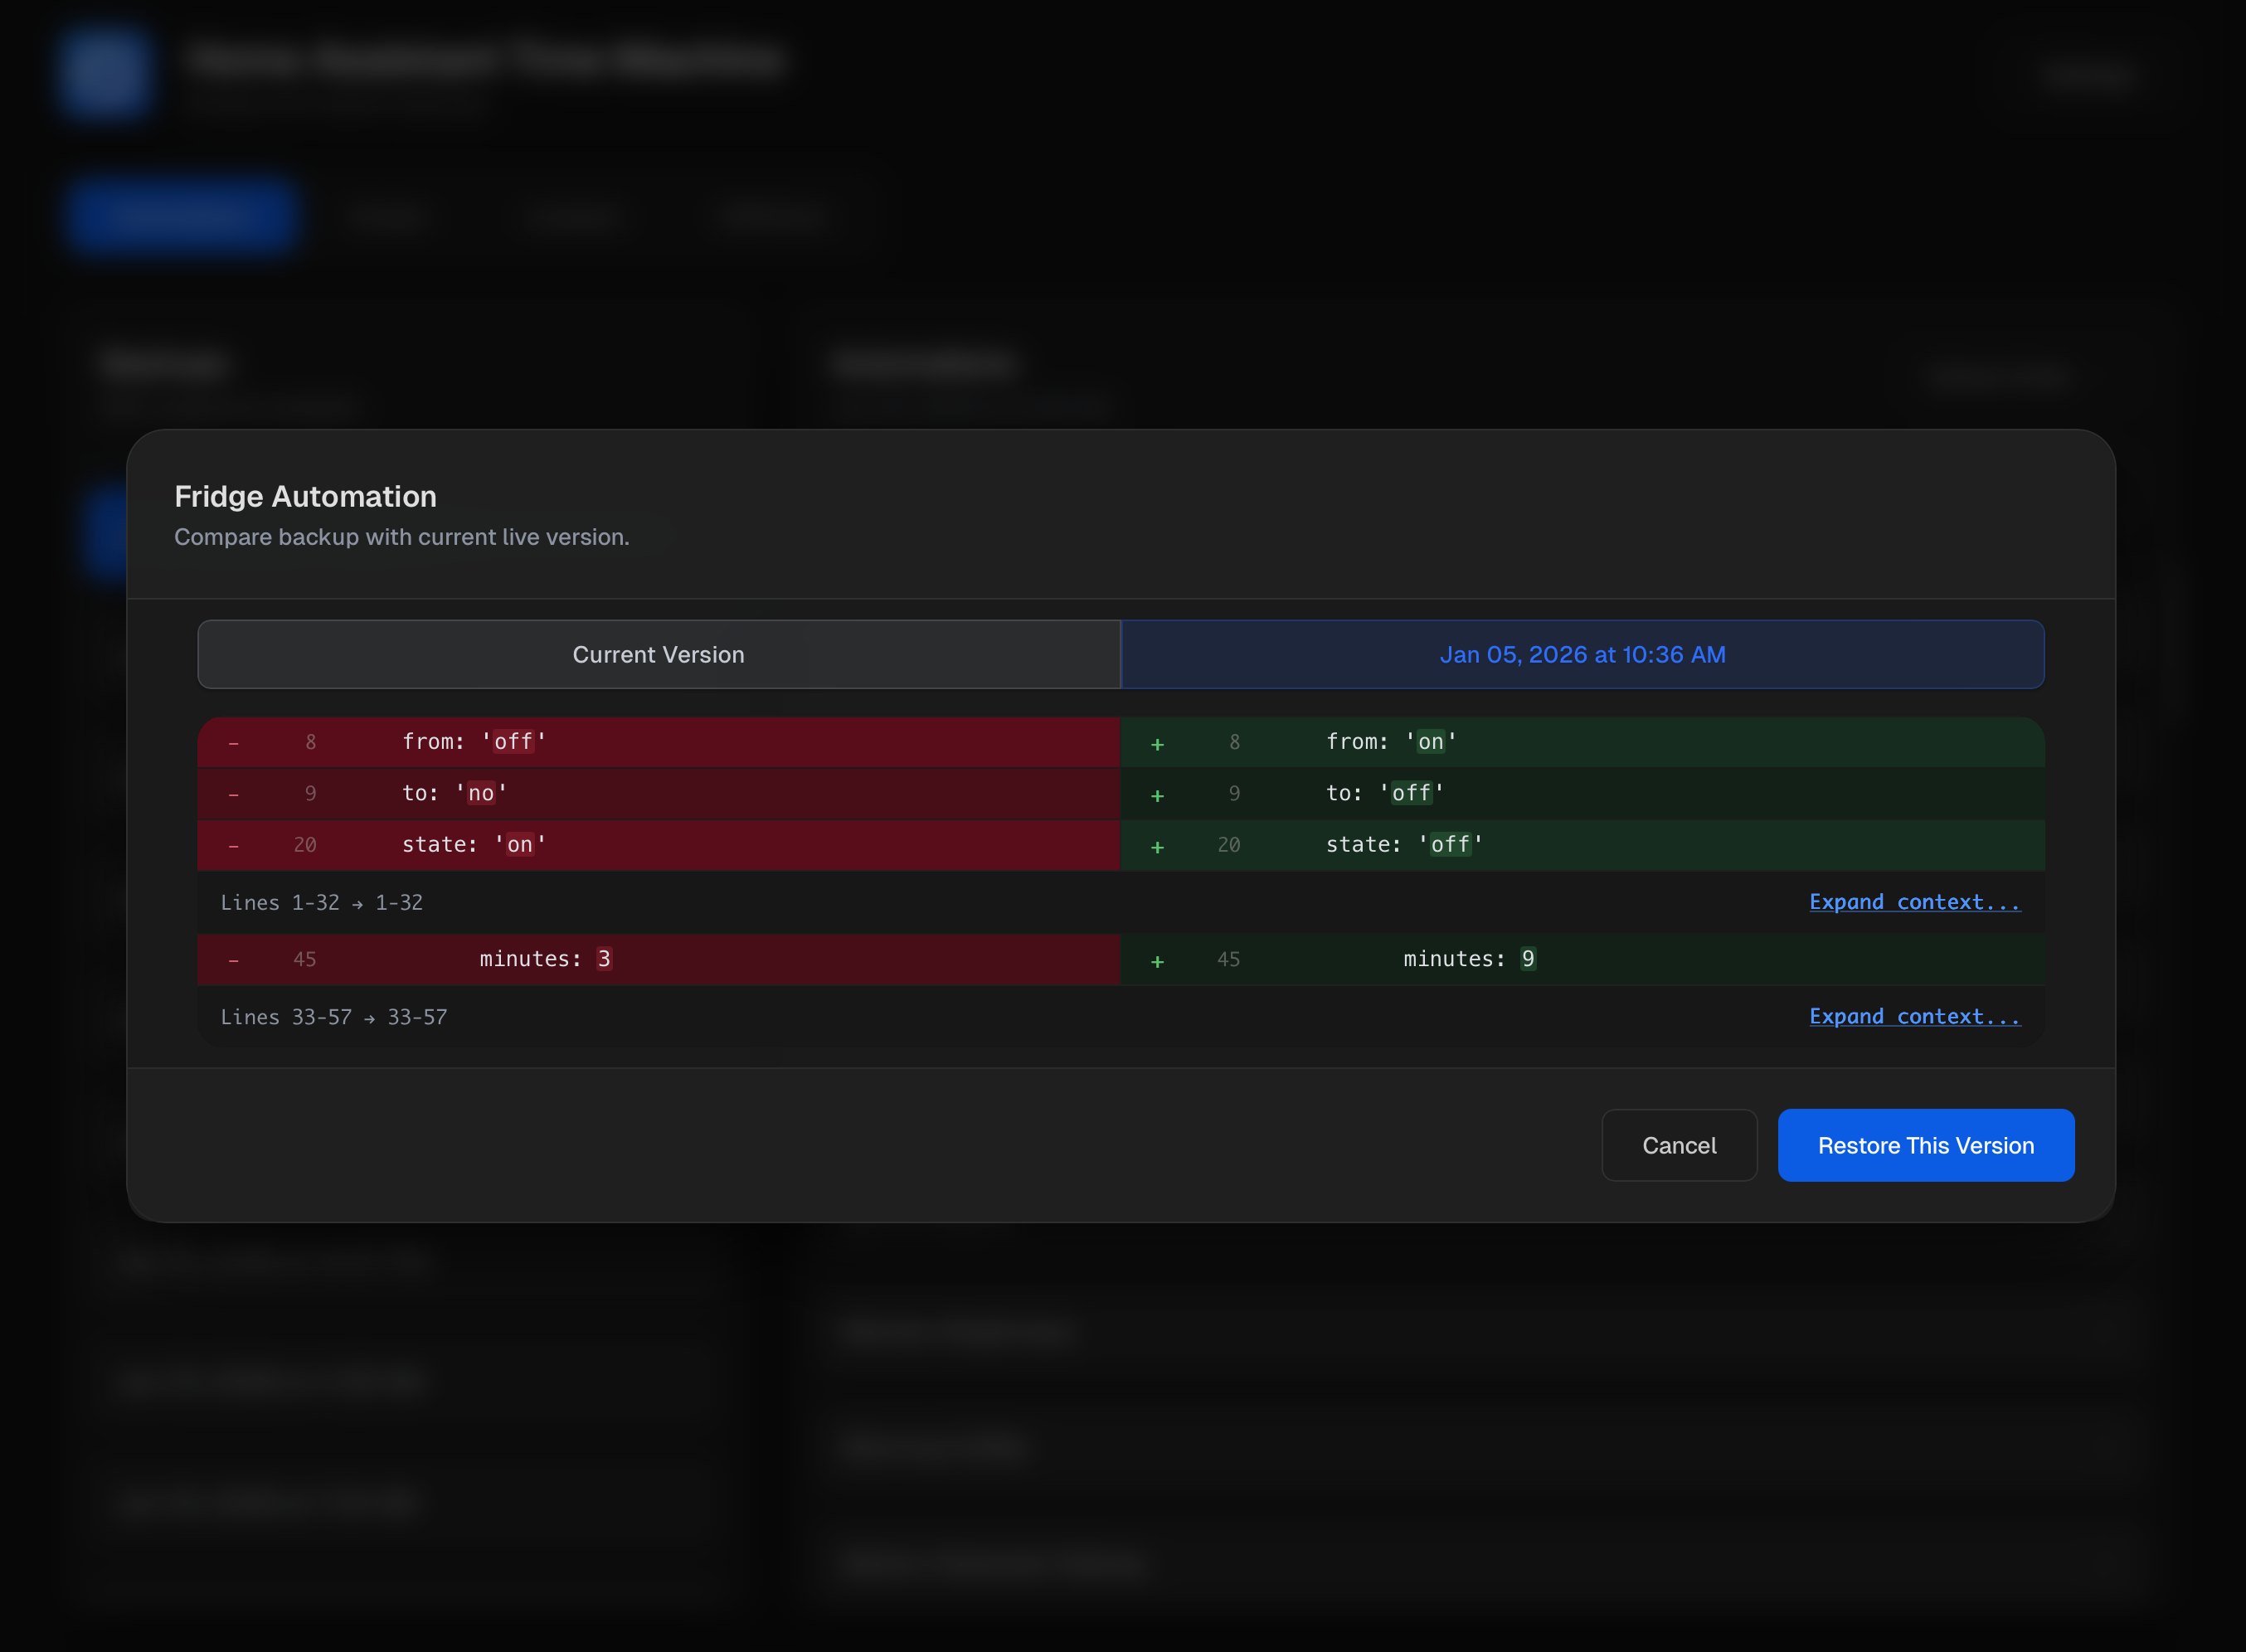
- View Changes: See a side-by-side diff of the changes between a backed-up item and the live version.
- Restore Individual Items: Restore individual automations or scripts without having to restore an entire backup.
- Safety first: It automatically creates a backup of your YAML files in your backups folder before restoring anything.
- Reload Home Assistant: Reload automations or scripts in Home Assistant directly from the UI after a restore.
- Scheduled Backups: Configure automatic backups of your Home Assistant configuration directly from the UI.
There are two ways to install Home Assistant Time Machine: as a Home Assistant add-on or as a standalone Docker container.
-
Add Repository: Click the button below to add the repository to your Home Assistant instance:
Or manually add it:
- Navigate to Settings → Add-ons → Add-on Store
- Click the three dots (⋮) in the top right corner and select Repositories
- Add the repository URL:
https://github.com/saihgupr/ha-addons
-
Install the Add-on: The "Home Assistant Time Machine" add-on will now appear in the store. Click on it and then click "Install".

For Docker users who aren't using the Home Assistant add-on, you have three deployment options:
Option A: Docker Compose (recommended):
-
Download the compose.yaml file:
curl -o compose.yaml https://raw.githubusercontent.com/saihgupr/HomeAssistantTimeMachine/main/compose.yaml
-
Edit the file to set your paths and credentials:
nano compose.yaml
-
Start the service:
docker compose up -d
Option B: Docker Run (pre-built image):
docker run -d \
  -p 54000:54000 \
  -e HOME_ASSISTANT_URL="http://your-ha-instance:8123" \
  -e LONG_LIVED_ACCESS_TOKEN="your-long-lived-access-token" \
  -v /path/to/your/ha/config:/config \
  -v /path/to/your/backups:/media \
  -v ha-time-machine-data:/data \
  --name ha-time-machine \
  ghcr.io/saihgupr/homeassistanttimemachine:latest
Option C: Build locally:
git clone https://github.com/saihgupr/HomeAssistantTimeMachine.git
cd HomeAssistantTimeMachine/homeassistant-time-machine
docker build -t ha-time-machine .

docker run -d \
  -p 54000:54000 \
  -e HOME_ASSISTANT_URL="http://your-ha-instance:8123" \
  -e LONG_LIVED_ACCESS_TOKEN="your-long-lived-access-token" \
  -v /path/to/your/ha/config:/config \
  -v /path/to/your/backups:/media \
  -v ha-time-machine-data:/data \
  --name ha-time-machine \
  ha-time-machine
Supplying the URL and token keeps credentials out of the UI. These environment variables are optional—if you set them, the settings fields are read-only; if you omit them, you can enter credentials in the web UI instead.
Alternative: omit the environment variables, start the container with the same volumes, then visit http://localhost:54000 to enter credentials in the settings modal. They are stored in /data/docker-ha-credentials.json.
After the container is running, you can toggle ESPHome support, adjust text style, and switch light/dark modes by POSTing to the app settings API. This persists the value in /data/homeassistant-time-machine/docker-app-settings.json so the UI reflects it on reload:
curl -X POST http://localhost:54000/api/app-settings \
  -H 'Content-Type: application/json' \
  -d '{
        "theme": "light",
        "esphomeEnabled": true,
        "packagesEnabled": true,
        "language": "de"
      }'
Adjust the payload if you need different paths, theme, or want to enable/disable features ("esphomeEnabled": true|false, "packagesEnabled": true|false, "theme": light|dark, "language": en|es|de|fr|nl|it).
After starting the container, access the web interface at http://localhost:54000 (or your server's IP/port).
Note: The HA URL and token fields in settings will be read-only if configured via environment variables, or editable if configured through the web UI.
Tip: If you expose port
54000/tcp(for example, via the add-on's Configuration tab), you can open the UI directly athttp://your-host:54000without relying on ingress.
- Configure the add-on: In the add-on's configuration tab, set theme, language, esphome/packages toggle, and port.
- Start the add-on.
- Open the Web UI:
- Use Open Web UI from the add-on panel to launch ingress (default recommended when the external port is disabled).
- Or, if you've enabled port
54000/tcpin the add-on configuration, browse tohttp://homeassistant.local:54000(or your configured host/port).
- In-app setup:
- In the web UI, go to the settings menu.
- Live Home Assistant Folder Path: Set the path to your Home Assistant configuration directory (e.g.,
/config). - Backup Folder Path: Set the path to the directory where your backups are stored (e.g.,
/media/timemachine).
- Start the container with the required volume mounts (see Docker installation above).
- Open the Web UI at
http://localhost:54000(or your server's IP/port). - In-app setup:
- In the web UI, go to the settings menu.
- Live Home Assistant Folder Path: Set to
/config(this is the mounted volume). - Backup Folder Path: Set to
/media/timemachine(this is the mounted volume).
To configure backups to a remote share, first set up network storage within Home Assistant (Settings > System > Storage > 'Add network storage'). Name the share 'backups' and set its usage to 'Media'. Once configured, you can then specify the backup path in Home Assistant Time Machine settings as '/media/backups', which will direct backups to your remote share.
- POST /api/backup-now: Trigger an immediate backup (requires
liveFolderPathandbackupFolderPath). - POST /api/restore-automation / POST /api/restore-script: Restore a single automation or script after creating a safety backup.
- POST /api/restore-lovelace-file / POST /api/restore-esphome-file / POST /api/restore-packages-file: Restore Lovelace, ESPHome, or package files with automatic pre-restore backups.
- *POST /api/get-backup- ** & */api/get-live- ** families: Fetch specific items from backups or the live config (automations, scripts, Lovelace, ESPHome, packages).
- GET /api/schedule-backup / POST /api/schedule-backup: Inspect or update scheduled backup jobs.
- POST /api/scan-backups: Scan the backup directory tree and list discovered backups.
- POST /api/validate-path / POST /api/validate-backup-path: Verify that provided directories exist and contain Home Assistant data/backups.
- POST /api/test-home-assistant-connection: Confirm stored Home Assistant credentials work before saving.
- POST /api/reload-home-assistant: Invoke a Home Assistant reload service (e.g.,
automation.reload). - GET /api/health: Simple status endpoint exposing version, ingress state, and timestamp.
Example usage:
# Trigger backup
curl -X POST http://localhost:54000/api/backup-now \
  -H "Content-Type: application/json" \
  -d '{"liveFolderPath": "/config", "backupFolderPath": "/media/timemachine"}'

# Get scheduled jobs
curl http://localhost:54000/api/schedule-backup

# Scan backups
curl -X POST http://localhost:54000/api/scan-backups \
  -H "Content-Type: application/json" \
-d '{"backupRootPath": "/media/timemachine"}'For detailed history tracking powered by a local Git backend, check out Home Assistant Version Control. It provides complete version history for your setup by automatically tracking every change to your YAML files.
- File issues or feature requests at GitHub Issues.
- Share feedback on usability so we can keep refining backup workflows.
If you find this add-on helpful, please ⭐ star the repository!